 Traveling with our home Dishnet 322 receiver.
Many RVers travel the country roughing it with a satellite TV receiver. Although most of these travelers have a dedicated receiver / antenna system while traveling, we simply pack up our home receiver, and hit the road. Why not, no ones at home watching the home satellite, so why not use the home receiver while on the road. Its already paid for, so no extra fees for a different reciever or any pay-as-you-go plan fees.
USING OUR HOME RECEIVER
W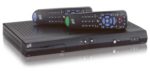 e use our Dish model 322 home receiver while on the road. It’s an older standard definition dual receiver, two receiver’s in one. This article can apply regardless of what receiver you have.
We hit the US highways a few months out of the year with stops at different locations for a few days, a few weeks, even a month at one location.
Our #322 receiver uses the signals from two satellites that are received by the antennas Low Noise Feeds (LNB), 110 and 119. The 322 receiver uses an external LNB switch to switch between the LNBs. One coax cable runs from this switch out to the antenna where the antenna has an internal LNB switch to select which LNB the receiver wants to use.
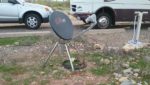
THE ANTENNA DISH 1000.2
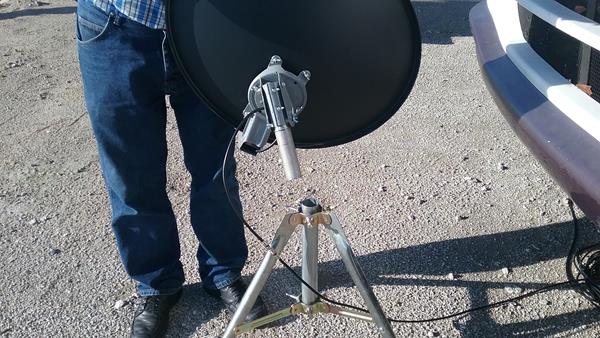
The antenna we use at home is a standard System 500, 2 LNB dish antenna mounted on our TV tower. But while traveling, I use a Dishnet 1000.2 antenna. This is a 3 LNB antenna purchased on e-bay that included a tripod, squawk meter, cable, and some other accessories.

Using a tripod has advantages, We can position it anywhere that has a clear view of the southern sky, and it only takes a few minutes to set up, point it, and start watching TV. I use these tools to set up and point the antenna.
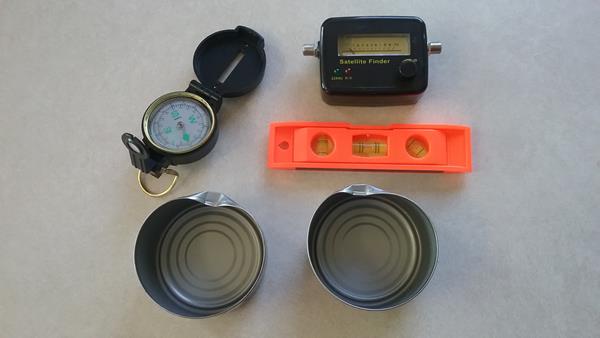
Compass – This is used to find the direction to point the antenna. The Azimuth (AZ) angle.
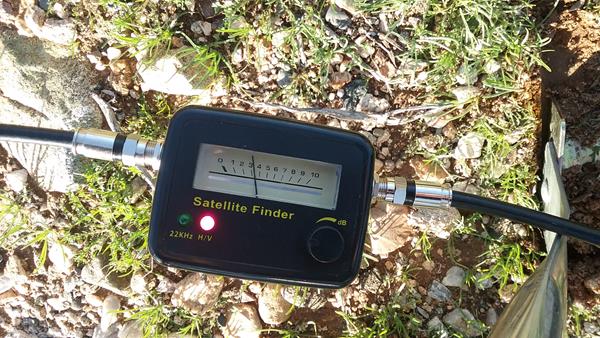
Squawk Meter – This is an inexpensive meter that shows signal strength and has an audio tone when its pointed at a satellite. It connects between the LNBs and the receiver.
Bubble level – this one has a magnet on it to hold it to the mast while leveling.
2 Cat food cans – these are used to cover the two outside LNBs when aiming. You could use any metallic object that blocks the signal, i.e. tin foil to block the LNBs while aiming.
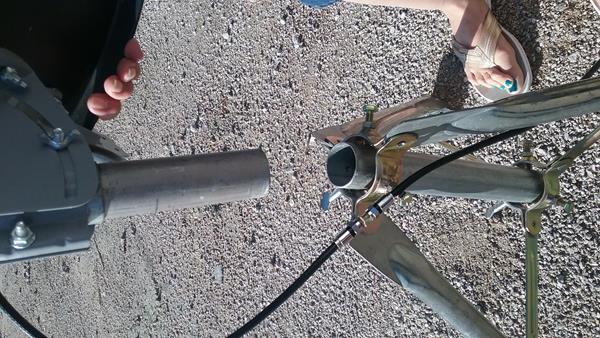
ALSO – I made some minor modifications to the antenna and tripod to make adjusting and leveling a lot easier and more convenient. I replaced all the nuts with wing nuts to make assembly and adjustments easier, and also modified the mast tubes that mount the antenna to the tripod. I modified the mast tubes so a larger diameter tube stays with the tripod, and a smaller diameter tube stays with the dish. When setting up, the smaller diameter tube (antenna)slides down inside the larger tube (tripod).
The 3 LNB antenna receives signals from three satellites, 110, 119, and 129. My 322 reciever only uses 110 and 119. The LNB assembly on the antenna has a built in switch that is controlled by the receiver. This allows the use of one coax cable to the receiver rather than two or three.
AIMING THE DISH
The location selected must have a clear view of the satellites. There are several smart phone apps that can make this easier. I’ve had good luck just eyeballing it, i.e. I stand at my proposed antenna location, and use a compass to look in the direction shown as AZ. I then look up, estimating the EL angle.
When aiming the antenna, there are some expensive meters that make the job a little easier, but I’ve found the following procedure works, and takes less time than using the expensive meter. Follow these steps.
1) Getting the pointing angles. There are several sources. I use either the reciever Use a mailing address and zip code for a location nearby. I use the campground Zip code, or a nearby town or business zip code.. We’ll need the complete address if we need to change our “Service” location (See NOTE 2) but we need the “zip code” to look up the antenna pointing parameters in the installation table.
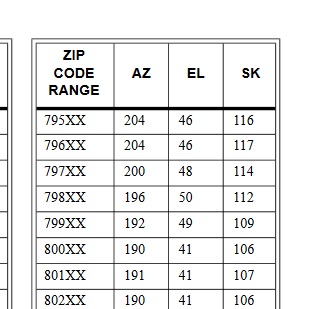
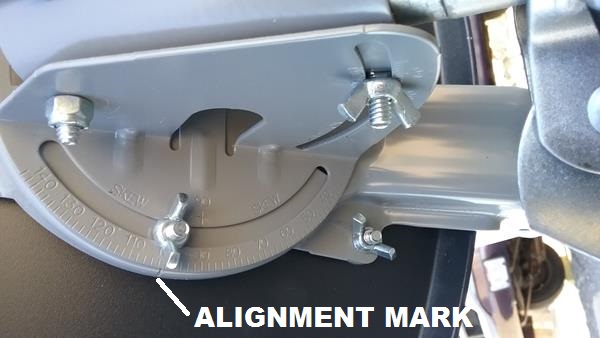
Using the table in the “1000.2 Installation Manual” look up the Zip code and find the Azimuth (AZ), Elevation (EL), and Skew (SK) angles for pointing.
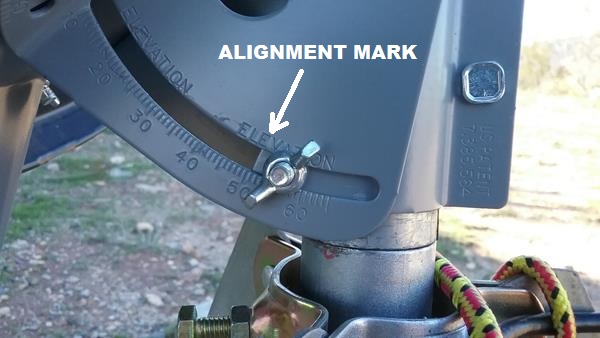
2) Assemble and adjust the antenna for the EL (elevation) and SK (skew) angles that you looked up. Snug the nuts up, but not to tight yet.
3) Level the antenna mast. I use a small bubble level and dig little holes or shim the legs, or whatever it takes to get the mast perfectly level.
THIS IS THE MOST IMPORTANT STEP – If the mast is not level, you could spend hours trying to find the correct satellites. However, if the mast is level, this process will take only a few minutes.
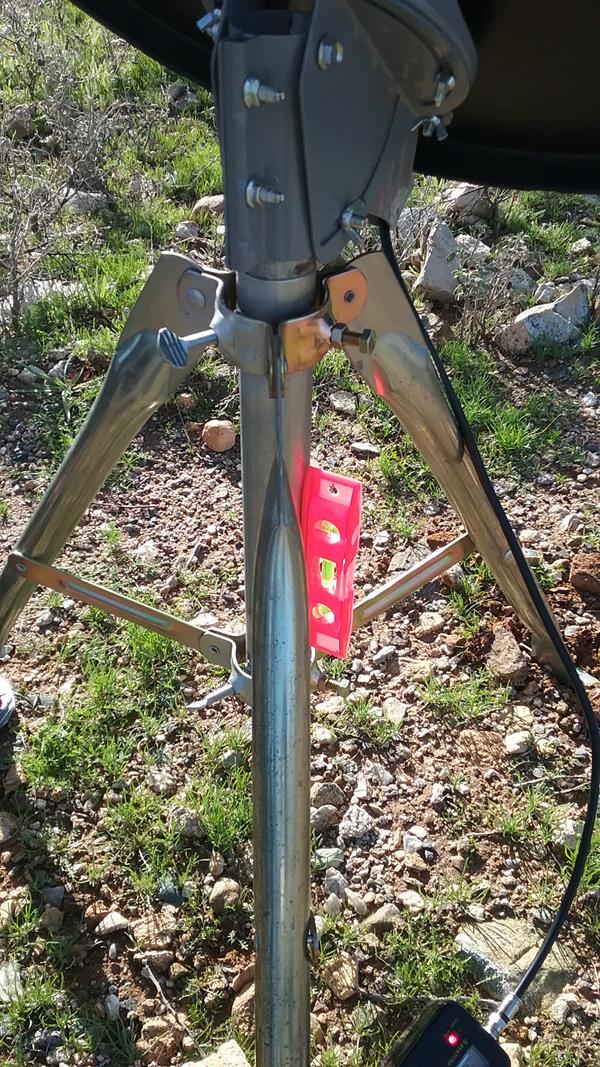
Position the antenna on the tripod and using a compass, point it generally in the AZ (azimuth) direction. Re-verify the tripod is level.
4) I installed a short piece of coax that stays attached to the antennas LNBs. I then run a long coax that connects to the RV and the Satellite receiver. Temporarily use the little Squawk Meter to connect the antenna coax to the receiver coax. Note on the back of the meter what connector connects to the LNBs and what connector connects to the receiver. Turn the Satellite receiver on, the Satellite receiver supplies power to the antennas LNBs and the integral LNB switch.
5) Put the covers over the two outside LNBs so they can’t receive anything.
Turn the volume / sensitivity knob up/down until the meter just starts to move and you can hear a squeal from the meter.
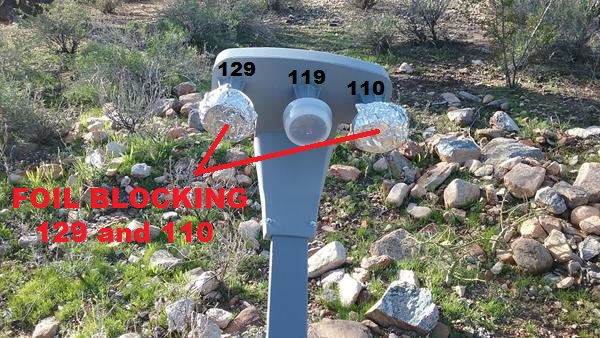
Why cover the two outside LNBs? A more expensive meter can power and control the LNBs and tell exactly what satellite each of the LNBs is pointing at. However, the cheap squawk meter I use for alignment can only detect signal strength, it cannot control what LNB is used, identify the satellite, or tell what LNB is producing the signal. By blocking the two outer LNBs, we are guaranteeing the signal on the meter is coming from the center LNB only. We use the Dishnet receivers “POINT DISH” menu to tell us what satellite is currently being received.
This antenna is designed so that when aligned correctly, the center LNB will be pointing at and receive Sat #119, the left LNB #129, and the right LNB #110. By covering the two LNBs, we are making sure that we are not receiving #119 on either of those two LNBs while pointing the dish.
6) With the antenna pointed in the general direction of the AZ, slowly move the antenna back and forth no more than 10-15 degrees. You should find a peak tone and meter reading on the Squawk meter, this should be Satellite 119. If you don’t see a signal, double check that the mast is level, and the EL and SK setting are adjusted properly.
7) Your Receiver should have an “Antenna Pointing” menu. Select “119” in the Satellite window. When the receiver gets a signal from the dish, the bottom of the menu will show signal strength, and what satellite it sees. It should show 119.
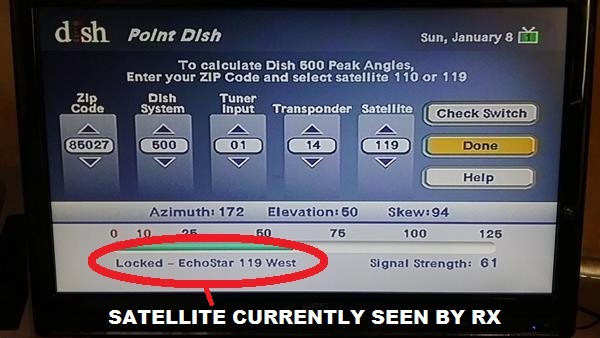
If the receiver shows its locking onto satellite 110 or 129, you’ll need to turn the antenna about 10 degrees left if showing 129, or 10 degrees right, if showing 110 (viewed from back of antenna). Generally, you’ll see this happen in the western states where the SKEW angles are low; i.e. the satellites are beside each other so rotating the antenna in azimuth, you can easily pick up 129 and 110. (SEE NOTE 5) In the eastern states, 110 and 129 tend to be more above and below 119, The SKEW setting, the dish is almost sideways.
Once aligned with 119, I tweak the antenna elevation by pushing/pulling at the top of the dish to see if I get a increase in signal strength.
Once I have good signal strength and the receiver locks onto it, I remove the two covers from the 110 and 129 LNBs, I also remove the squawk meter and replace it with a simple barrel connector.
Turn the receiver OFF, then on again. The receiver should start trying to acquire channels and the channel guide. This can take a few minutes (SEE NOTE 1)
NOTES
Note 1 – HARD RESET OF RECEIVER
If the receiver has a warning message that says the card isn’t authorized, try doing a hard reset.
1) Remove the authorization card
2) Press and hold the receiver POWER button for about 10 seconds.
3) Reinsert the authorization card and turn the receiver on again.
The receiver will search for (acquire) satellites and also the channel guide.
Note 2 – CHANGING YOUR SERVICE ADDRESS
The satellites have highly directional transmitting beams (antennas). Your “Service Location” determines what “beam” your receiver locks onto. This is particularity important if you subscribe to “Local Channels” .
If you move your receiver a great distance (several hundreds of miles) you may need to call Dishnet and change your “Service Address”. Your receiver will then lock onto the correct beam. The symptoms will be; you have a channel guide, but no channels or channels missing.
Call or use the Web “CHAT” to contact Dishnet. DON’T MENTION THE WORDS “RV”.
Most Dishnet call center reps will become very confused if you tell them you are in an “RV” and are traveling. They will most likely tell you that your “home” receiver will not work in your “RV” .
If you get into this conversation, insist all they need to do is change your “Service Address” ONLY. DO NOT change your billing address. Use the campground address, or an address somewhere close by. You’ll need your receivers ID number. this can be found under the “System Info” menu on your receiver
I contact Dishnet via their web site “CHAT”. I then copy/paste the following into the CHAT. Change the receiver model, ID number, Service and Billing addresses to match your account.
COPY/PASTE the following into the webchat ——————————
I’ve temporarily moved and am using my Model #XXXXX receiver at my new location. I need you to change my “Service Address” only. My Billing address remains the same.
Receiver # Rxx xxxx xxxx-xx
NEW SERVICE ADDRESS
Address Number and Street
City, State, Zip
Do NOT change my billing address, It remains the same at:
Address Number and Street
City, State, Zip
Thank you.
Note 3 – SWITCH TEST
Switch Test – My receiver (Dish 322) is a two LNB receiver that uses 110 and 119 only, If I conduct a “Switch Test” it reports back that it found three LNBs, and do I want to use all three or disregard the findings and use two. I tell it to disregard and only use two.
Note 4 – 1000.2 LNB BUILT IN SWITCH
The LNB assembly has three output connectors and one input connector (four connectors. DO NOT LET THIS CONFUSE YOU. This allows you to feed three different Satellite receivers from this antenna. I use one coax to feed my 322 receiver.
Note 5 – “LOCKED UNKNOWN SATELLITE”
On rare occasion, I’ve seen it where instead of showing satellite 119, it says something like “unknown”. I think this has to do with what transponder the antenna is seeing. If your sure your pointing in the correct direction and the mast is level. attempt to see if you can see channels anyway.