
If your unfortunate enough to live in the cold climates, then this will be an annual chore that you’ll want to do before the first freeze sets in. otherwise you’ll find extensive and expensive damage to just about everything in your water system.
The Mirada manual is helpful, but this will give you a little more detail. This procedure will use three gallons of antifreeze.
Here is what we’re going to do to winterize the water system:
- drain the water lines, water heater, and fresh water tank.
- pump antifreeze into the lines
- pump antifreeze into the fresh tank
- dump antifreeze into all the “P” traps and toilet
- drain the gray and black tanks.
Next spring we will de-winterize and sanitize the water system.
- Pump Bleach solution into Fresh water tank
- Fill fresh tank with 20 gallons water
- pump sanitize solution through cold and hot water lines
- re-fill water tank with fresh water
- pump fresh water through hot and cold water lines.
WINTERIZE – DRAIN THE WATER LINES
The Mirada has a neat panel that makes water system operations easy, once you get past the intimidation.
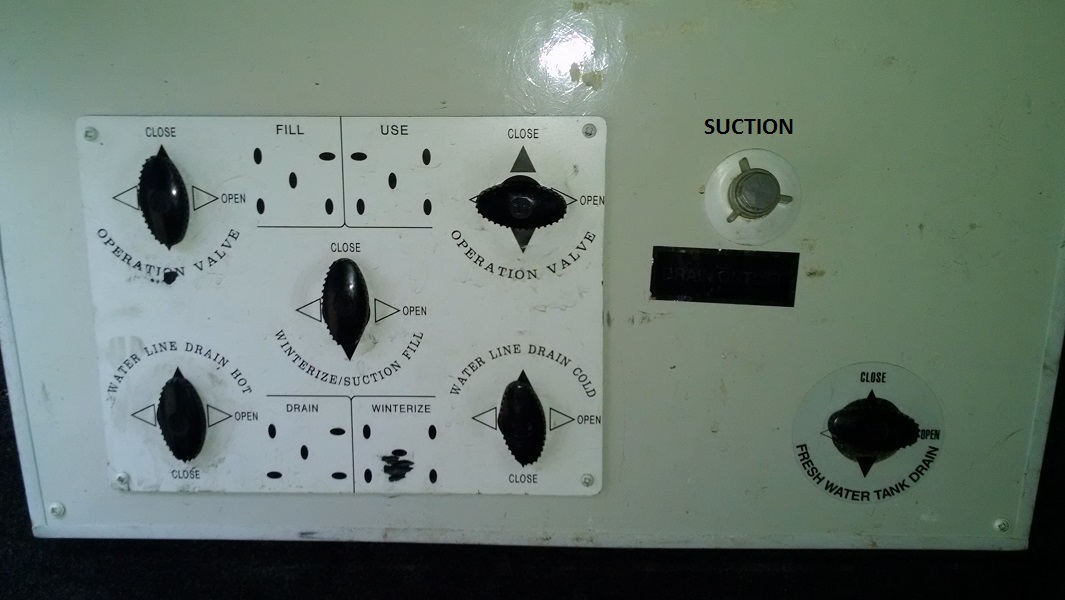
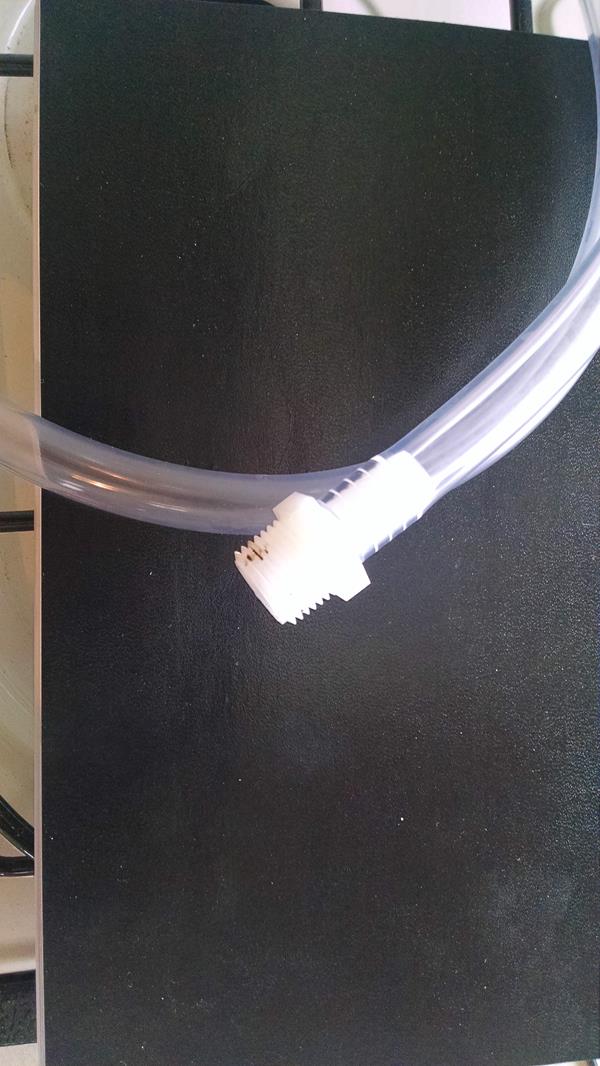
You will need a special hose and fitting to suck fluid into the fresh water tank.
1) Look at the water system valve panel, Using the “DRAIN” guide drawing (lower left corner of guide drawing). Place the system valves in the DRAIN positions.
2) To the right of the panel is the fresh water tank drain valve, open that valve.
3) In the coach, open all the water faucets, including shower and toilet. Leave them open.
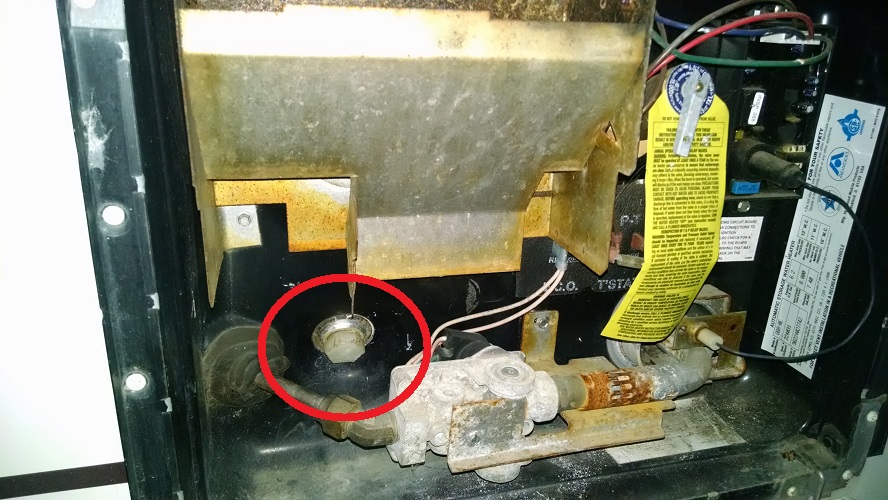
4) On the outside, drain the water heater by removing the water heater drain plug. (lower left corner)
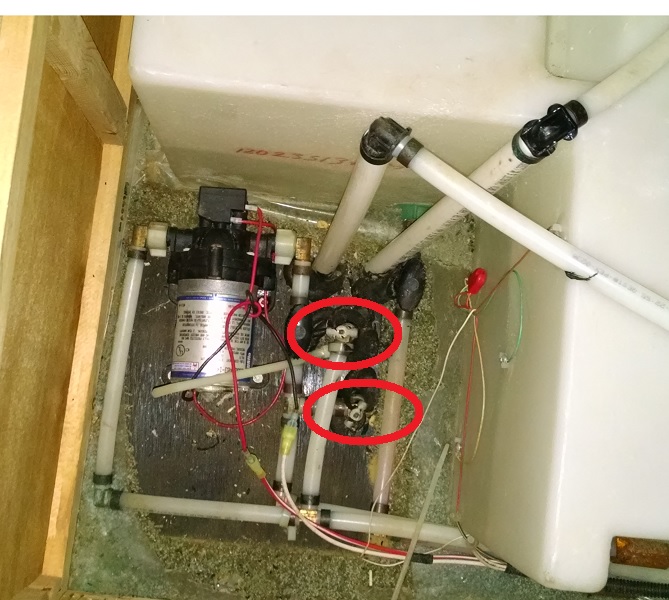
5) Under the bed, Open the two water line drains near the water pump.
NOTE – If you have an air compressor, you can also use an air adapter fitting that screws onto the city water, and blow air through the lines. Use caution to not exceed 30 psi else you could damage the water system pipe and fittings.
When all the water is drained, I like to run RV antifreeze in the lines, this will make sure there isn’t any water pooled in the lines, water pump, or water heater that will freeze and do damage. This takes about 2 gallons.
PUMPING RV ANTIFREEZE INTO WATER LINES
1) Close all the drain valves that were opened in the above steps (Fresh water drain, water pup drains, and the system panel drains)
2) Look at the water panel and set the valves to the “WINTERIZE” positions (see lower right of panel)
3) Connect your suction hose to the “SUCTION” fitting beside the water panel. This is not a water hose , but a special fitting and 6 ft of hose. The fitting is the same as that used on your water heater or your household faucets water supply lines.
Stick the end of the hose in a gallon of RV antifreeze, If you don’t have a helper, a clip or jamming a rag in the top of the jug will keep the hose from flopping out.

4) On the water heater, Close the two valves that go into the water heater, and open the valve that bypasses the water heater.
5) Turn the pump ON, This will suck antifreeze out of the jug and into the water lines.
One at a time, goto each faucet, hot and cold, and turn it on until antifreeze comes out.
Do the same for the shower
Flush the toilet until anti freeze comes out.
On the water heater, open the bottom (old in) valve for about 5 seconds. This will pump antifreeze into the water heater just in cases a small amount of water has pooled.
6) We will pump the remainder of the antifreeze into the fresh water tank, just in case any water is pooled in there.
7) With the water pump still running, position the system water valves to the “FILL” positions. Antifreeze will be sucked out of the jugs and pumped into the fresh water tank.
8) turn the pump off, disconnect the suction hose.
DE-WINTERIZING and SANITIZING
This procedure will de-winterize and sanitize the freshwater tank
1) Verify the fresh tank and all system drain valves are closed.
2) Close the Black and Gray tank dump valves.
3) Reinstall the Water Heater drain plug.
4) Open the two water heater IN/OUT valves and close the bypass valve.
5) close all water faucets.
6) On the water system panel, place the valves in the “FILL” position
7) Prepare a bleach solution. In a one gallon jug, mix 1 cup bleach, fill the rest of the jug with water.
8) Connect the suction hose to SUCTION fitting and the other end of the hose in the bleach solution jug.
9) Turn on the water pump, it will suck the solution out and place it in the fresh tank. Run the pump until the jug is empty.
10 Remove the Suction hose from the suction fitting and re-install the cap on the suction fitting
11) Connect city water to the city water fitting. The system panel should still be in the “FILL” mode.
Turn on the city water and fill 20-30 gallons into the fresh tank.
12) Turn off the city water.
13) Place the system valves in the “USE” position.
14) Turn on the water pump.
15) Go to each faucet and run it until the pink disappears and you can smell bleach in the water.
It will take a couple moments for the bleached water to show up at the hot faucets as the water eater tank will fill before you get any bleached water..
Don’t forget the shower and the toilet.
16) When you get bleached water at all the faucets, continue running the toilet and hot water until the fresh tank is empty.
17) Turn the water pump off.
18) Leave the system for 30-60 minute, then flush the system with fresh water.
FRESH WATER FLUSH
1) Verify the system panel valves are set to “USE”
2) Turn on the City water.
Go to each faucet and run it until the bleach is no longer present. It will take several moments to clear the bleach from the hot water lines as the water heater needs to be filled with fresh water.
If you wish to fill the fresh tank at this time, re-position the system water valve to “FILL”.
This is very helpful . I recently bought a 99 Mirada and replaced my pump after I found the old one seized . I thought that the small let cock style valves around near the pp were simply for bleeding air out of the system. But after reading this information, I realize that they are for bleeding the water out of the itself and determined that the previous owner mist have never done that for winterization and the pump likely iced up and fractured. Good bit of important info to know . Thankyou .
Thank you for continuing to keep this page up. It has been very valuable to us in getting to know our 2002 vintage Mirada as well as coping with issues that seem to be common to this coach.
We just bought at 1997 Mirada in great condition. Thank you for providing this information!