 IMPORTANT – If you needed to do the floor-to-wall repair that I reported on last year (READ HERE) , then you’ll also need to do the repair I’m reporting on below…..
On our last trip out west in January, the Mirada developed a loud screechy noise coming from the drivers side that sounded like two Styrofoam cups rubbing together. I looked and felt around but couldn’t pinpoint the source. I checked the floor to wall bolts I installed last year and they were tight.
With warm weather finally upon us, I decided to tackle the noise, I’m glad I did, because what I found also answered concerns I had regarding the floor to wall repairs that were done last year.
I discovered that if I pushed gently on the front cap just above the drivers side headlight, I could get it to make the noise. This helped a lot as I could now get my wife to push and I could climb around and find the source. The sound was coming from just below the mirror, somewhere around the seam/joint where the front cap connects to the side wall.
When I looked under the wheel well, I could see the joint, but when looking under the hood, the joint wasn’t visible as there was some F53 structural sheet metal in the way. I decided to take a couple panels off on the inside and see if I could see the joint from inside the motor home.
FOUND IT — And then some.
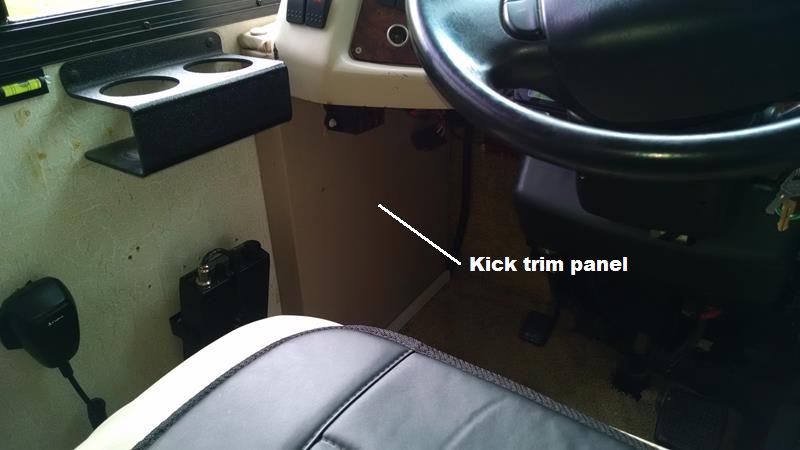
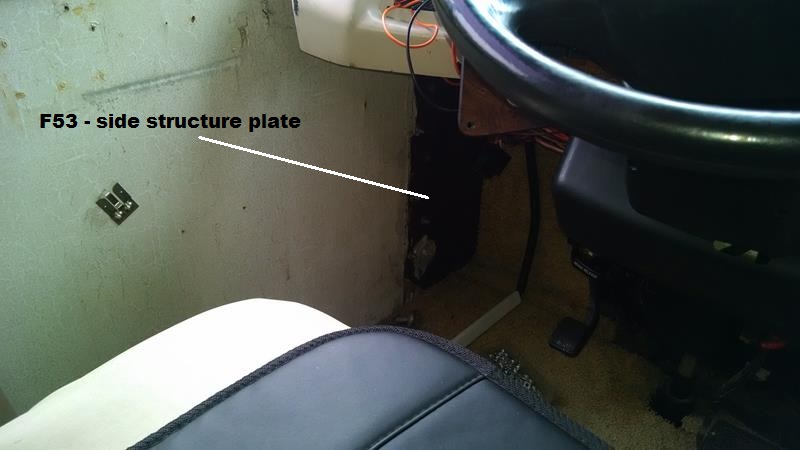
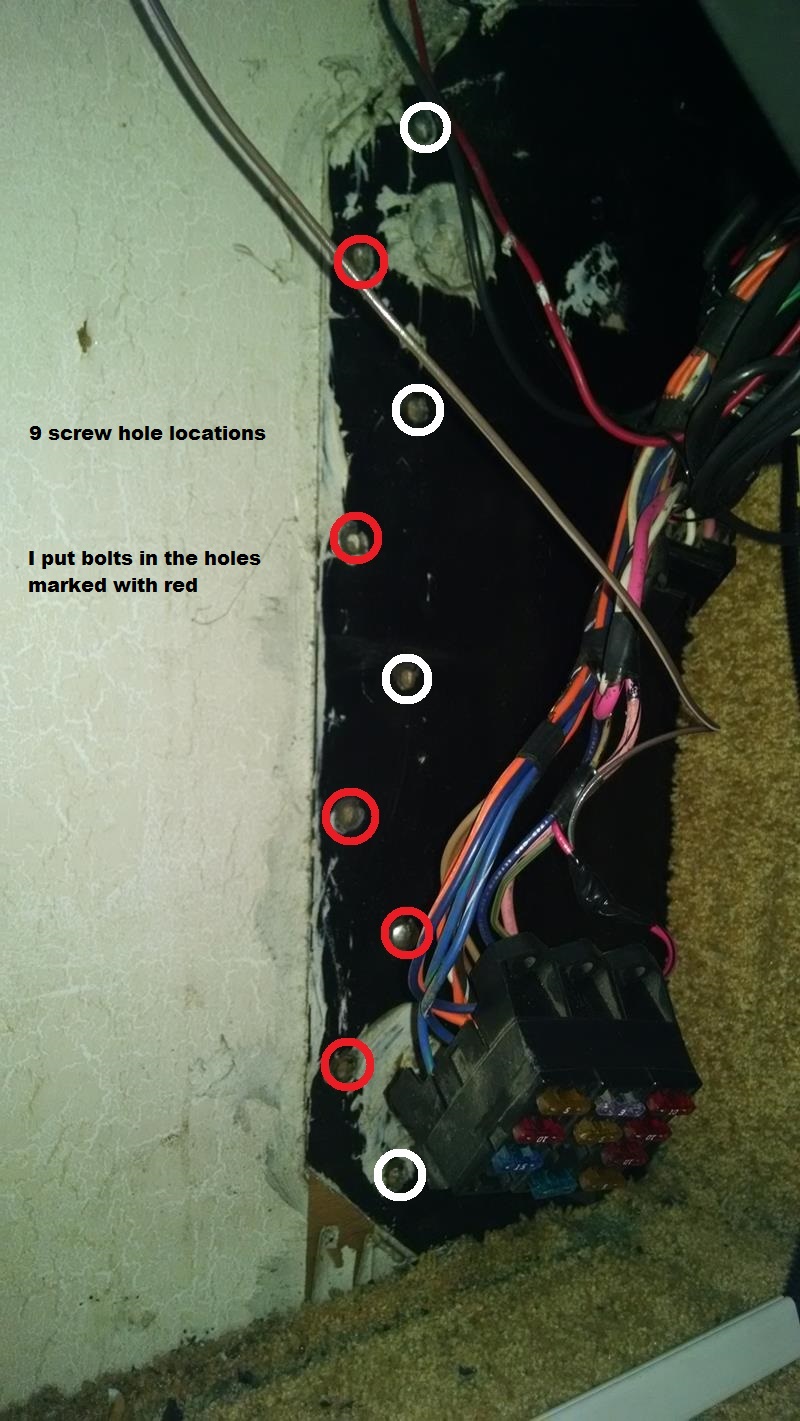
On the inside of the Mirada, I removed the drivers side kick trim panel. When I pulled the kick panel out, I found two large screws laying on the floor. The same type screws that were used to secure the wall to the floor. I could see on the structure plate where there had originally been 9 screws (marked in red and white in photo) holding the sidewall to the plate, none of them were installed. The noise was coming from the wall rubbing against this plate.
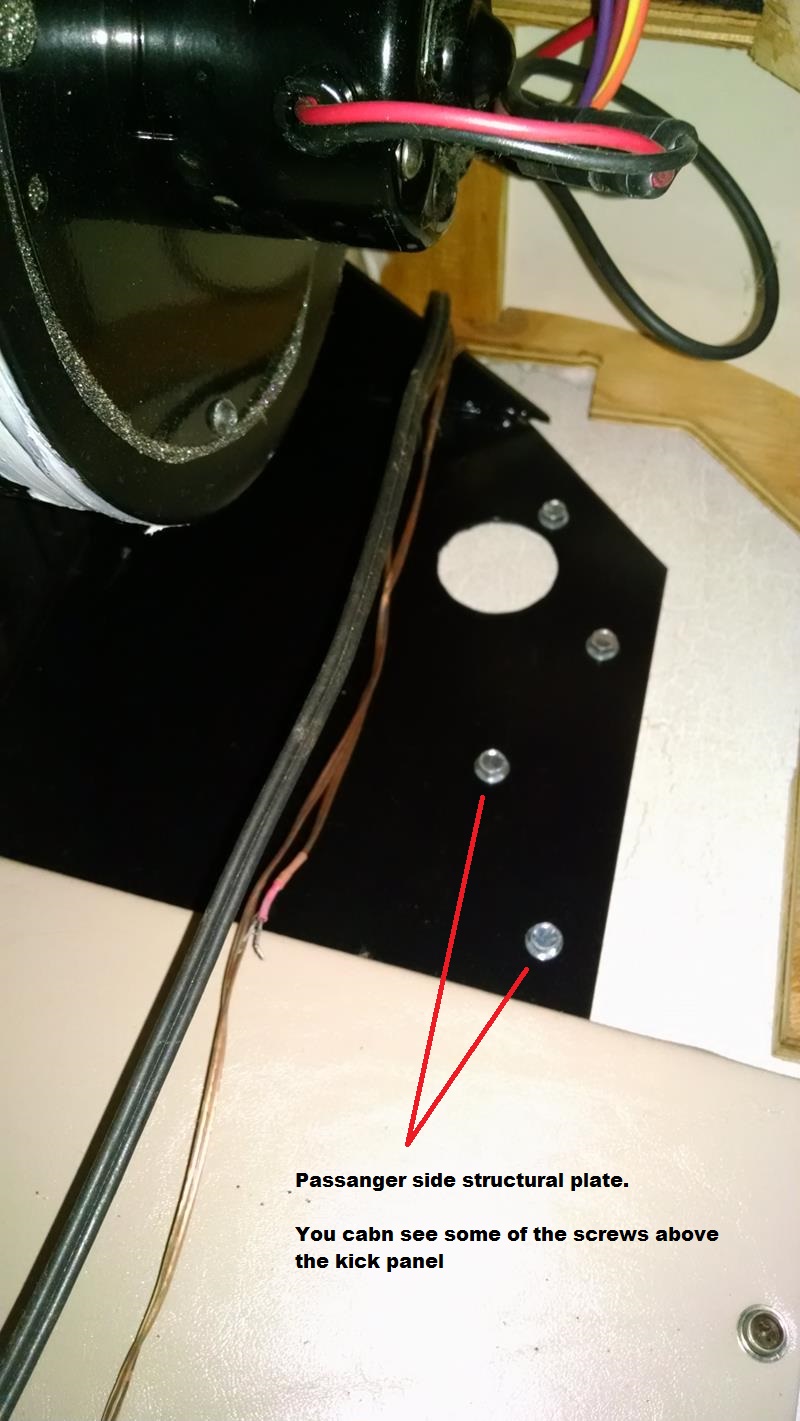
Out of curiosity, I looked up under the passenger side and could see nice pretty screws on the passenger side structure plate.
To test to see if this was my problem, I drilled one of the 9 holes all the way through to the outside of the wall. I went outside and pressed on the cap and squeak, squeak. the noise was there. I put a bolt and nut in the hole I just drilled, tightened it up a little to squeeze the wall against the plate, when I pushed on the front cap, NO NOISE. BAM – Found it…
I drilled four more holes through the plate and wall and installed 2 inch, 1/4 – 20 stainless carriage bolts (holes marked in red). On the very top bolt, the one under the mirror, I needed to grind the head a little so it wouldn’t hit the bottom of the mirror.
This plate is obviously part of the F53 structure and is what was used to attach the exterior wall to the chassis. When I did the floor repair last year, it held the wall in place, but the wall was able to start moving a small amount, and was rubbing against this plate, making the noise. In hind site, its a good thing this happened, as the plate, not the floor, is supposed to provide the majority of support for the side wall. If your screws are missing from the floor, I bet they are also missing from this plate.
OBSERVATION:
#1 – Structural support of the drivers side wall. Last year when I did the emergency wall repair (READ HERE) , I couldn’t believe the floor to wall screws were the only thing that secured the outside wall to the chassis. Obviously not, The wall is also (should be) secured to the chassis with screws through this plate.
#2 – What happened to the missing screws? There were 9 holes in the plate and from the marks in the holes, there were screws installed at one time. Yet when I removed the kick panel, I found only two screws. The only thing I can think of is that last year when the wall was completely separated, they could have fallen through the large opening between the floor and the wall.
Yes! I had the same problem and it happened when I was on a trip. This is our first RV and I was not aware of the vast amount of repair and maintenance it would need so it did surprise me a bit. I pulled into a parking lot to try to track squeaky noise and found the same problem. Scary. I had motion between the cap and the body. I have since heard if Mirada owners who have found the front cap actually coming off while under way. I shimmed the holes a bit and reinstalled the bolts while I looked for an Ace Hardware. Ace tends to have the better quality bolts and lags. I got the same length but the next thickness up and a tube of 3m “5200” used by boaters (motto don’t use 5200 if you ever want to get it off again.) When we got to where we were going I removed all of the lag screws and got as much 5200 behind the metal panel as I could and shot some into each hole. I put in the larger lags. They did seem to get good traction going in. I hoped the 5200 would dry fast enough to help. It worked and I have not had a problem since. I have checked the curb side and like you have not had any problem there at all.
Since that time I have added 4 large 6v batteries to the nose without a problem.
I really appreciate your effort to post all of your experience and work on your Mirada. If you wish I can post some of the things I repair. Just let me know how.
If you want to write them up and provide photos, I’d be more than happy to post them here..
john
Great stuff, John. Ours is a 2000 Mirada. And we have plenty of projects to undertake before we look into the side wall matter. But we’ll do so with much more confidence thanks to your post.
Al, Thanks for the response – do a quick inspection of the wall to floor attach screws. Look up inside the front wheel wells and you’ll see the angle iron that secures the wall to the floor, If none of the screws have fallen out, then your probably OK. If your missing any of the screws, then make it a priority to deal with it.
Thank you so much the front feels so much better now .